6. Buildroot Application
6.1 HDMI Display
Connect the board and monitor with a HDMI cable, then start up.
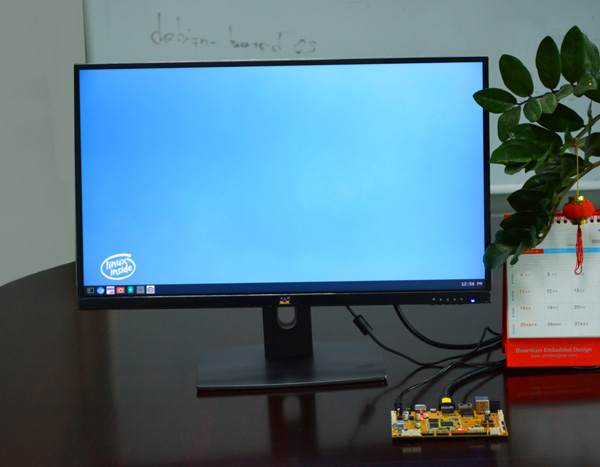
HDMI display
Note
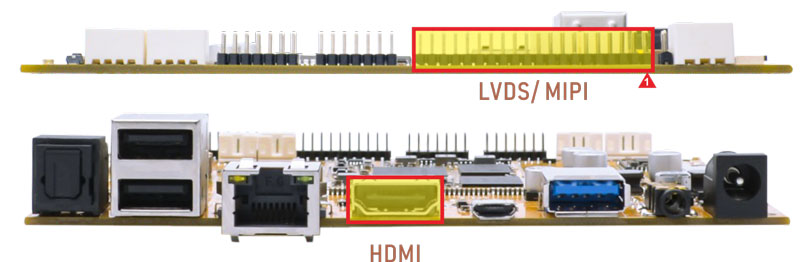
The Boardcon factory default HDMI display. If change to LVDS/MIPI please reflash
boot.img
10.1” MIPI LCD:
boot-10.1inch_mipi.img10.1” LVDS LCD:
boot-10.1inch_lvds.img7” LVDS LCD:
boot-7inch_lvds.imgHDMI:
boot-hdmi.img
6.2 SD Card
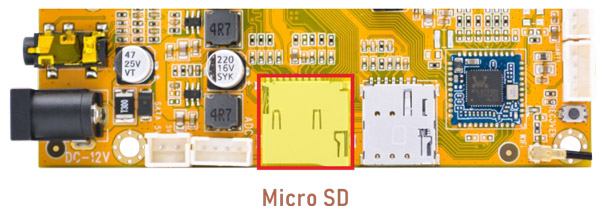
The SD card is automatically mounted. EM3566 supports SD Hot-plug.
1df -h
2ls /mnt/sdcard
root@rk3566-buildroot:/# df -h
Filesystem      Size  Used Avail Use% Mounted on
/dev/root       5.9G  592M  5.0G  11% /
devtmpfs        970M  8.0K  970M   1% /dev
tmpfs           981M  156K  981M   1% /tmp
tmpfs           981M  364K  981M   1% /run
tmpfs           981M     0  981M   0% /dev/shm
/dev/mmcblk0p7  121M   12M  101M  11% /oem
/dev/mmcblk0p8  911M  416K  848M   1% /userdata
/dev/mmcblk1p1   30G   72M   30G   1% /mnt/sdcard
root@rk3566-buildroot:/# ls /mnt/sdcard
 2.wav        Download            Notifications                cm3576Android141
6.3 USB
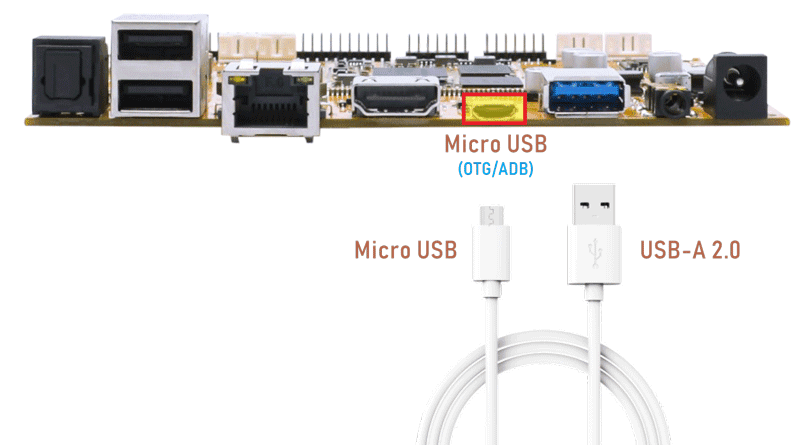
6.3.1 Micro USB
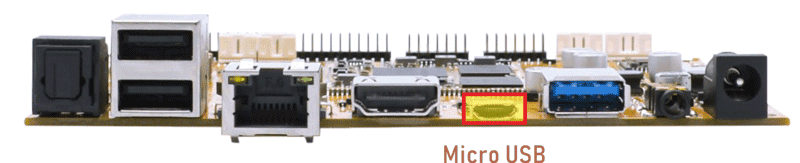
The micro USB is mainly used for firmware upgrades and ADB function.
ADB is the command-line debugging tool. It can use for system logs, uploading and downloading the files, installing the applications, etc.
❶ connect the board and PC host with Micro USB cable.
❷ install ADB driver on Windows system.
❸ press Windows + R to open the Run program. Type cmd and press Enter
❹ execute commands to enable ADB and test.
Push the file com located in PC E:\EM3566\Tool\Test\ to the board for example:
1adb push E:\EM3566\Tool\Test\com /system
2adb shell
3chmod 777 /system/com    //modify com properties
6.3.2 USB Host
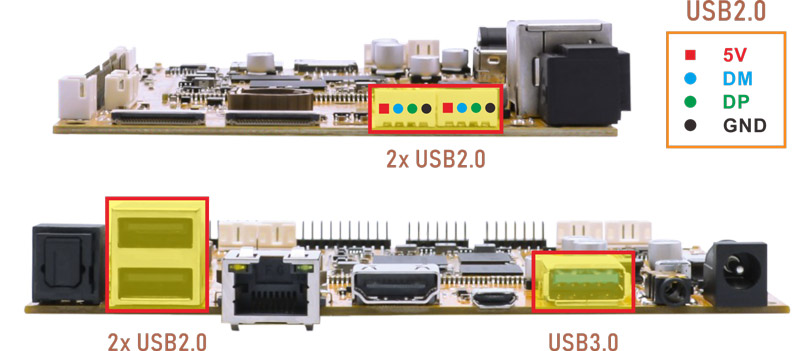
The USB Host can be used to connect USB mouse, USB keyboard, U-Disk or other USB devices.
1df -h
2ls /mnt/udisk
root@rk3566-buildroot:/# df -h
Filesystem      Size  Used Avail Use% Mounted on
/dev/root       5.9G  591M  5.0G  11% /
devtmpfs        970M  8.0K  970M   1% /dev
tmpfs           981M  252K  981M   1% /tmp
tmpfs           981M  376K  981M   1% /run
tmpfs           981M     0  981M   0% /dev/shm
/dev/mmcblk0p7  121M   12M  101M  11% /oem
/dev/mmcblk0p8  911M  128K  848M   1% /userdata
/dev/sda1       116G   30G   87G  26% /mnt/udisk
root@rk3566-buildroot:/# ls mnt/udisk
 1080p_h264.mp4   Android      Idea3588        Podcasts
 2.wav            Audiobooks   LOST.DIR        Recordings
 4K-ice.mp4       DCIM         Movies          Ringtones
 4K.mp4           Documents    Music          'System Volume Information'
 4K60p.mp4        Download     Notifications   test-2.wav
 Alarms           EM3566       Pictures        test.wav
6.4 Video Player
Copy video file to SD card/U-disk then insert it to the board. After system boot execute the command to test.
6.4.1 Test 1080P
1gst-play-1.0 --videosink=xvimagesink XXX //XXX is file path
Play 1080p_h264.mp4 in /mnt/udisk/ for example:
rk3566-buildroot:/# gst-play-1.0 --videosink=xvimagesink /mnt/udisk/1080p_h264.mp4
Press 'k' to see a list of keyboard shortcuts.
Now playing /mnt/udisk/1080p_h264.mp4
Redistribute latency...
Redistribute latency...
E: [alsa-sink-fe410000.i2s-ES8323 HiFi ES8323.1-0010-0] alsa-sink.c: ALSA woke us up to write new data to the device, but there was actually nothing to write.
E: [alsa-sink-fe410000.i2s-ES8323 HiFi ES8323.1-0010-0] alsa-sink.c: Most likely this is a bug in the ALSA driver '(null)'. Please report this issue to the ALSA developers.
E: [alsa-sink-fe410000.i2s-ES8323 HiFi ES8323.1-0010-0] alsa-sink.c: We were woken up with POLLOUT set -- however a subsequent snd_pcm_avail() returned 0 or another value < min_avail.
Redistribute latency...
Redistribute latency...
Redistribute latency...
0:01:20.4 / 0:09:56.4
6.4.2 Test 4K
1export GST_MPP_VIDEODEC_DEFAULT_ARM_AFBC=1              //set AFBC
2cat /sys/kernel/debug/dri/0/state | grep "plane\["      //view the plane id (select Cluster0-win0)
3GST_DEBUG=*mpp*:4 gst-play-1.0 --flags=3 --videosink="kmssink plane-id=70" /XXX         //play video. XXX is the file path
4GST_DEBUG=*mpp*:4 gst-play-1.0 --flags=3 --videosink="kmssink plane-id=70" /mnt/udisk/4K.mp4 --audiosink="alsasink device=hw:1,0"   //Specify audio channel output
Play 4K.mp4 in /mnt/udisk/ for example:
root@rk3566-buildroot:/# export GST_MPP_VIDEODEC_DEFAULT_ARM_AFBC=1
root@rk3566-buildroot:/# cat /sys/kernel/debug/dri/0/state | grep "plane\["
plane[56]: Smart0-win0
plane[70]: Cluster0-win0
plane[92]: Esmart0-win0
root@rk3566-buildroot:/# GST_DEBUG=*mpp*:4 gst-play-1.0 --flags=3 --videosink="kmssink plane-id=70" /mnt/udisk/4K.mp4
Press 'k' to see a list of keyboard shortcuts.
Now playing /mnt/udisk/4K.mp4
Redistribute latency...
Redistribute latency...
0:00:01.071566108  1166   0x7f7c012700 INFO                  mppdec gstmppdec.c:507:gst_mpp_dec_apply_info_change:<mppvideodec0> applying NV12(AFBC) 3840x2160 (3840x2176)
0:00:01.116891404  1166   0x7f7c012700 INFO                  mppdec gstmppdec.c:934:gst_mpp_dec_loop:<mppvideodec0> video info changed
0:00:01.117107238  1166   0x7f7c012700 WARN                  mppdec gstmppdec.c:578:gst_mpp_dec_get_frame:<mppvideodec0> MPP is not able to generate pts
Redistribute latency...
Redistribute latency...
Redistribute latency...
0:00:08.5 / 0:18:47.1
Specify audio channel output:
root@rk3566-buildroot:/# GST_DEBUG=*mpp*:4 gst-play-1.0 --flags=3 --videosink="kmssink plane-id=70" /mnt/udisk/4K.mp4 --audiosink="alsasink device=hw:1,0"
Press 'k' to see a list of keyboard shortcuts.
Now playing /mnt/udisk/4K.mp4
Redistribute latency...
Redistribute latency...
0:00:01.017073436  1186   0x7f94013b00 INFO                  mppdec gstmppdec.c:507:gst_mpp_dec_apply_info_change:<mppvideodec0> applying NV12(AFBC) 3840x2160 (3840x2176)
WARNING No volume control found
WARNING debug information: ../gst/playback/gstplaysink.c(2908): gen_audio_chain (): /GstPlayBin:playbin/GstPlaySink:playsink:
Volume/mute is not available
0:00:01.046618397  1186   0x7f94013b00 INFO                  mppdec gstmppdec.c:934:gst_mpp_dec_loop:<mppvideodec0> video info changed
0:00:01.046842397  1186   0x7f94013b00 WARN                  mppdec gstmppdec.c:578:gst_mpp_dec_get_frame:<mppvideodec0> MPP is not able to generate pts
Redistribute latency...
Redistribute latency...
Redistribute latency...
0:00:10.3 / 0:18:47.1
6.5 Ethernet

Connect the Board and router with an Ethernet cable (default DHCP=Yes). User can ping URL/IP at terminal.
eg.
1ifconfig
2ping www.boardcon.com
root@rk3566-buildroot:/# ifconfig
eth0      Link encap:Ethernet  HWaddr 52:47:13:61:97:DC
          inet addr:192.168.0.253  Bcast:192.168.0.255  Mask:255.255.255.0
          inet6 addr: fe80::c3e2:d9a5:188e:431d/64 Scope:Link
          UP BROADCAST RUNNING MULTICAST  MTU:1500  Metric:1
          RX packets:70 errors:0 dropped:0 overruns:0 frame:0
          TX packets:33 errors:0 dropped:0 overruns:0 carrier:0
          collisions:0 txqueuelen:1000
          RX bytes:10851 (10.5 KiB)  TX bytes:2974 (2.9 KiB)
          Interrupt:50

lo        Link encap:Local Loopback
          inet addr:127.0.0.1  Mask:255.0.0.0
          inet6 addr: ::1/128 Scope:Host
          UP LOOPBACK RUNNING  MTU:65536  Metric:1
          RX packets:40 errors:0 dropped:0 overruns:0 frame:0
          TX packets:40 errors:0 dropped:0 overruns:0 carrier:0
          collisions:0 txqueuelen:1000
          RX bytes:2848 (2.7 KiB)  TX bytes:2848 (2.7 KiB)

p2p0      Link encap:Ethernet  HWaddr 62:FB:00:75:AC:F8
          UP BROADCAST MULTICAST  MTU:1500  Metric:1
          RX packets:0 errors:0 dropped:0 overruns:0 frame:0
          TX packets:0 errors:0 dropped:0 overruns:0 carrier:0
          collisions:0 txqueuelen:1000
          RX bytes:0 (0.0 B)  TX bytes:0 (0.0 B)

wlan0     Link encap:Ethernet  HWaddr 60:FB:00:75:AC:F8
          UP BROADCAST MULTICAST  MTU:1500  Metric:1
          RX packets:0 errors:0 dropped:0 overruns:0 frame:0
          TX packets:0 errors:0 dropped:0 overruns:0 carrier:0
          collisions:0 txqueuelen:1000
          RX bytes:0 (0.0 B)  TX bytes:0 (0.0 B)

root@rk3566-buildroot:/# ping www.boardcon.com
PING www.boardcon.com (67.222.54.196) 56(84) bytes of data.
64 bytes from 67-222-54-196.unifiedlayer.com (67.222.54.196): icmp_seq=1 ttl=48 time=188 ms
64 bytes from 67-222-54-196.unifiedlayer.com (67.222.54.196): icmp_seq=2 ttl=48 time=189 ms
64 bytes from 67-222-54-196.unifiedlayer.com (67.222.54.196): icmp_seq=3 ttl=48 time=188 ms
64 bytes from 67-222-54-196.unifiedlayer.com (67.222.54.196): icmp_seq=4 ttl=48 time=188 ms
^C
--- www.boardcon.com ping statistics ---
4 packets transmitted, 4 received, 0% packet loss, time 3000ms
rtt min/avg/max/mdev = 187.545/188.002/188.958/0.561 ms
6.6 Audio I/O
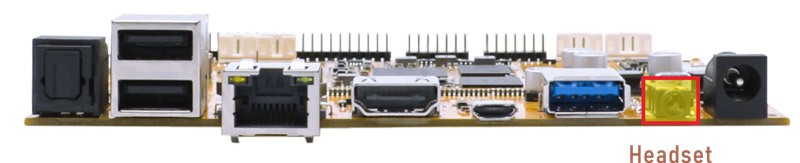
❶ plug the Headset into the 3.5mm Audio jack.
❷ excute the commands to record and play.
1aplay -l       //view audio equipment
2arecord -Dhw:0,0 -d 10 -f cd -r 44100 -c 2 -t wav test.wav    //start recording
3aplay test.wav         //play record file through HDMI
4aplay -Dhw:1,0 test.wav       //play record file through earphone
root@rk3566-buildroot:/# aplay -l
**** List of PLAYBACK Hardware Devices ****
card 0: rockchiphdmi [rockchip,hdmi], device 0: fe400000.i2s-i2s-hifi i2s-hifi-0 [fe400000.i2s-i2s-hifi i2s-hifi-0]
  Subdevices: 1/1
  Subdevice #0: subdevice #0
card 1: rockchipes8388c [rockchip,es8388-codec], device 0: fe410000.i2s-ES8323 HiFi ES8323.1-0010-0 [fe410000.i2s-ES8323 HiFi ES8323.1-0010-0]
  Subdevices: 1/1
  Subdevice #0: subdevice #0

root@rk3566-buildroot:/# arecord -Dhw:1,0 -d 10 -f cd -r 44100 -c 2 -t wav test.wav
Recording WAVE 'test.wav' : Signed 16 bit Little Endian, Rate 44100 Hz, Stereo
root@rk3566-buildroot:/# ls
bin               info        media  proc           sbin      tmp       vendor
busybox.fragment  lib         misc   resolv.conf    sdcard    udisk
data              lib64       mnt    rockchip-test  sys       userdata
dev               linuxrc     oem    root           system    usr
etc               lost+found  opt    run            test.wav  var

root@rk3566-buildroot:/# aplay test.wav
Playing WAVE 'test.wav' : Signed 16 bit Little Endian, Rate 44100 Hz, Stereo
E: [alsa-sink-fe410000.i2s-ES8323 HiFi ES8323.1-0010-0] alsa-sink.c: ALSA woke us up to write new data to the device, but there was actually nothing to write.
E: [alsa-sink-fe410000.i2s-ES8323 HiFi ES8323.1-0010-0] alsa-sink.c: Most likely this is a bug in the ALSA driver '(null)'. Please report this issue to the ALSA developers.
E: [alsa-sink-fe410000.i2s-ES8323 HiFi ES8323.1-0010-0] alsa-sink.c: We were woken up with POLLOUT set -- however a subsequent snd_pcm_avail() returned 0 or another value < min_avail.

root@rk3566-buildroot:/# aplay -Dhw:1,0 test.wav
Playing WAVE 'test.wav' : Signed 16 bit Little Endian, Rate 44100 Hz, Stereo
6.7 RTC
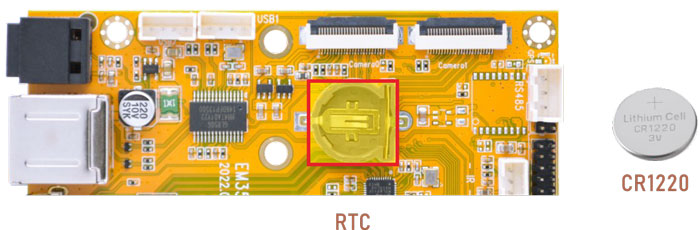
❶ insert a CR1220 battery before test. It keeps the time running when the main power is off.
❷ set date and time
1date -s "2024-12-30 10:30:00"     //set system time
2hwclock -w           //synchronize system time and RTC time
3hwclock
root@rk3566-buildroot:/# date -s "2024-12-30 10:30:00"
Mon Dec 30 10:30:00 UTC 2024
root@rk3566-buildroot:/# hwclock -w
root@rk3566-buildroot:/# hwclock
Mon Dec 30 10:30:20 2024  0.000000 seconds
root@rk3566-buildroot:/# hwclock
Mon Dec 30 10:30:37 2024  0.000000 seconds
6.8 WiFi & Bluetooth
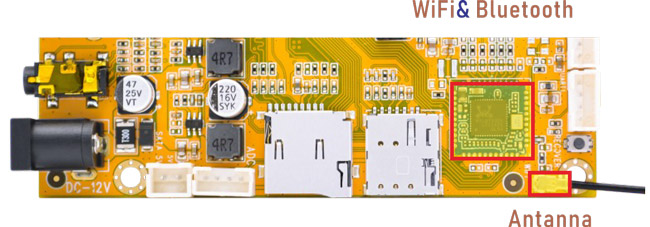
6.8.1 WiFi
Connect the WiFi antenna, input SSID and password to test.
1ifconfig eth0 down      //close eth0 (wired network)
2wifi__start.sh SSID PSK  //'SSID': user SSID, 'PSK': password
After connected, ping URL/IP at terminal to test network.
1ifconfig
2ping www.boardcon.com
User also can execute the following commands to test wifi.
❶ search hotspot.
1ifconfig eth0 down
2ifconfig wlan0 up
3iwlist wlan0 scan
root@rk3566-buildroot:/# ifconfig eth0 down
root@rk3566-buildroot:/# ifconfig wlan0 up
root@rk3566-buildroot:/# iwlist wlan0 scan
wlan0     Scan completed :
         Cell 01 - Address: B4:F1:8C:6D:D1:24
                 ESSID:"Boardcon"
                 Protocol:IEEE 802.11bgn
                 Mode:Master
                 Frequency:2.462 GHz (Channel 11)
                 Encryption key:on
                 Bit Rates:300 Mb/s
                 Extra:wpa_ie=dd160050f20101000050f20401000050f20401000050f202
                 IE: WPA Version 1
                     Group Cipher : CCMP
                     Pairwise Ciphers (1) : CCMP
                     Authentication Suites (1) : PSK
                 Extra:
                 IE: IEEE 802.11i/WPA2 Version 1
                     Group Cipher : CCMP
                     Pairwise Ciphers (1) : CCMP
                     Authentication Suites (1) : PSK
                 IE: Unknown: DD910050F204104A0001101044000102103B00010310470010123456789ABCDEF01234B4F18C6DD1241021001948756177656920546563686E6F6C6F677920436F2E2C4C74641023000B576972656C657373204150102400033132331042000531323334351054000800060050F2040001101100095443373130322D3130100800020780103C0001011049000600372A000120
                 Quality=92/100  Signal level=55/100
                 Extra:fm=0003
         Cell 02 - Address: 46:6A:48:F1:FD:9D
                 ESSID:""
                 Protocol:IEEE 802.11bgn
                 Mode:Master
                 Frequency:2.412 GHz (Channel 1)
                 Encryption key:on
                 Bit Rates:300 Mb/s
                 Extra:wpa_ie=dd160050f20101000050f20401000050f20401000050f202
                 IE: WPA Version 1
                     Group Cipher : CCMP
                     Pairwise Ciphers (1) : CCMP
                     Authentication Suites (1) : PSK
                 Extra:
                 IE: IEEE 802.11i/WPA2 Version 1
                     Group Cipher : CCMP
                     Pairwise Ciphers (1) : CCMP
                     Authentication Suites (1) : PSK
                 Quality=20/100  Signal level=10/100
                 Extra:fm=0002
         Cell 03 - Address: D8:32:14:25:B7:A8
                 ESSID:"LYB-2.4G"
                 Protocol:IEEE 802.11bgn
                 Mode:Master
                 Frequency:2.412 GHz (Channel 1)
                 Encryption key:on
                 Bit Rates:300 Mb/s
                 Extra:wpa_ie=dd160050f20101000050f20401000050f20401000050f202
                 IE: WPA Version 1
                     Group Cipher : CCMP
                     Pairwise Ciphers (1) : CCMP
                     Authentication Suites (1) : PSK
                 Extra:
                 IE: IEEE 802.11i/WPA2 Version 1
                     Group Cipher : CCMP
                     Pairwise Ciphers (1) : CCMP
                     Authentication Suites (1) : PSK
                 IE: Unknown: DD5A0050F204104A00011010440001021054000800060050F2040001101100135265616C74656B20576972656C65737320415010080002078010470010112233445566778899AAD8321425B7A0103C0001031049000600372A000120
                 Quality=92/100  Signal level=38/100
                 Extra:fm=0002
❷ configure the wireless hotspot to be connected.
1vi /etc/wpa_supplicant.conf //modify the SSID and password
ctrl_interface=/var/run/wpa_supplicant
ap_scan=1
update_config=1

network={
        ssid="input your SSID"
        psk="input your password"
        key_mgmt=WPA-PSK
}
~
~
~
❸ restart wifi and connect to the hotspot.
1wpa_supplicant -B -c /etc/wpa_supplicant.conf -i wlan0
❹ ping URL/IP at terminal to test network.
1ifconfig
2ping www.boardcon.com
root@rk3566-buildroot:/# ifconfig
lo        Link encap:Local Loopback
          inet addr:127.0.0.1  Mask:255.0.0.0
          inet6 addr: ::1/128 Scope:Host
          UP LOOPBACK RUNNING  MTU:65536  Metric:1
          RX packets:72 errors:0 dropped:0 overruns:0 frame:0
          TX packets:72 errors:0 dropped:0 overruns:0 carrier:0
          collisions:0 txqueuelen:1000
          RX bytes:4768 (4.6 KiB)  TX bytes:4768 (4.6 KiB)

p2p0      Link encap:Ethernet  HWaddr 62:FB:00:75:AC:F8
          UP BROADCAST MULTICAST  MTU:1500  Metric:1
          RX packets:0 errors:0 dropped:0 overruns:0 frame:0
          TX packets:0 errors:0 dropped:0 overruns:0 carrier:0
          collisions:0 txqueuelen:1000
          RX bytes:0 (0.0 B)  TX bytes:0 (0.0 B)

wlan0     Link encap:Ethernet  HWaddr 60:FB:00:75:AC:F8
          inet addr:192.168.0.213  Bcast:192.168.0.255  Mask:255.255.255.0
          inet6 addr: fe80::a0a4:a96c:2d0c:b404/64 Scope:Link
          UP BROADCAST RUNNING MULTICAST  MTU:1500  Metric:1
          RX packets:1790 errors:0 dropped:0 overruns:0 frame:0
          TX packets:106 errors:0 dropped:0 overruns:0 carrier:0
          collisions:0 txqueuelen:1000
          RX bytes:289744 (282.9 KiB)  TX bytes:11740 (11.4 KiB)

root@rk3566-buildroot:/# ping www.boardcon.com
PING www.boardcon.com (67.222.54.196) 56(84) bytes of data.
64 bytes from 67-222-54-196.unifiedlayer.com (67.222.54.196): icmp_seq=1 ttl=48 time=206 ms
64 bytes from 67-222-54-196.unifiedlayer.com (67.222.54.196): icmp_seq=2 ttl=48 time=193 ms
64 bytes from 67-222-54-196.unifiedlayer.com (67.222.54.196): icmp_seq=3 ttl=48 time=228 ms
64 bytes from 67-222-54-196.unifiedlayer.com (67.222.54.196): icmp_seq=4 ttl=48 time=194 ms
64 bytes from 67-222-54-196.unifiedlayer.com (67.222.54.196): icmp_seq=5 ttl=48 time=196 ms
^C
--- www.boardcon.com ping statistics ---
5 packets transmitted, 5 received, 0% packet loss, time 4425ms
rtt min/avg/max/mdev = 192.981/203.250/228.251/13.296 ms
6.8.2 Bluetooth
❶ open Bluetooth and scan device
1hciconfig hci0 up
2hciconfig hci0 iscan        //allow Bluetooth to be searched
3hcitool scan
root@rk3566-buildroot:/# hciconfig hci0 up
root@rk3566-buildroot:/# hciconfig hci0 iscan
[   81.225955] Bluetooth: hu 00000000a25f67cf retransmitting 1 pkts
root@rk3566-buildroot:/# hcitool scan
Scanning ...
[  131.833786] rtk_btcoex: hci (periodic)inq start
[  142.076792] rtk_btcoex: inquiry complete
        88:68:4B:74:39:44       OPPO K10 5G
        E0:80:6B:13:8E:99       a.
❷ allow Bluetooth to be pairable.
1hciconfig hci0 piscan
2bluetoothctl
root@rk3566-buildroot:/# hciconfig hci0 piscan
root@rk3566-buildroot:/# bluetoothctl
Agent registered
[CHG] Controller 60:FB:00:75:AC:F9 Pairable: yes
[bluetooth]#
❸ in the list of available Bluetooth devices on your phone, click BlueZ 5.62 to pair.
BlueZ 5.62 is the device name for EM3566 bluetooth.
Input yes
[NEW] Device E0:80:6B:13:8E:99 a
[a]#
[  168.058479] rtk_btcoex: io capability request
Request confirmation
[agent] Confirm passkey 482924 (yes/no): yes
[a]#
6.9 RS485
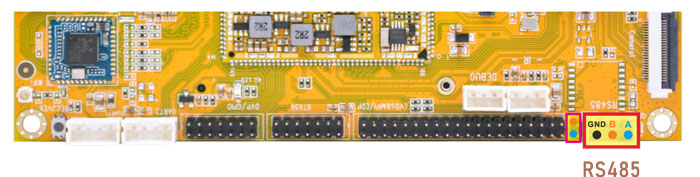
❶ push the file com to the board via ADB
❷ connect PC and board with USB-to-RS485 adapter.
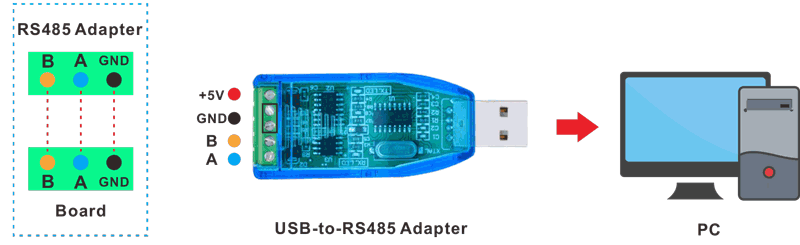
RS485 connection
❸ open the Serial Terminal and set baud rate for the board and RS485 adapter respectively.
Baud rate: board - 1500000; RS485 adapter - 115200
❹ execute command in the terminal of the board.
1./system/com /dev/ttyS3 115200 8 0 1
❺ input character to test RS485 communication.
6.10 UART
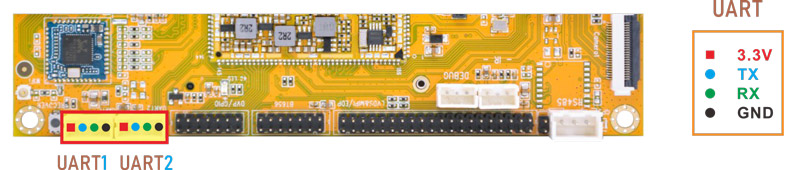
The UART loopback test is for reference only.
❶ push the file com to the board via ADB
❷ connect the transmit (TX) pin to the receive (RX) pin of UART.
❸ execute the command in the terminal.
1./system/com /dev/ttyS4 115200 8 0 1 //test UART4
❹ input character to test UART.
root@rk3566-buildroot:/#
root@rk3566-buildroot:/# .system/com /dev/ttyS4 115200 8 0 1
port = /dev/ttyS4
baudrate = 115200
cs = 8
parity = 0
stopb = 1
123456789
RECV: 123456789
abcdefgh
RECV: abcdefgh
❺ press Ctrl + C to exit UART4 testing, execute the command to test UART5.
1./system/com /dev/ttyS5 115200 8 0 1 //test UART5
root@rk3566-buildroot:/#
root@rk3566-buildroot:/# .system/com /dev/ttyS5 115200 8 0 1
port = /dev/ttyS4
baudrate = 115200
cs = 8
parity = 0
stopb = 1
bbbbbbbbbb
RECV: bbbbbbbbbb
uuuuuuuu
RECV: uuuuuuuu
6.11 M.2 SSD

EM3566 only supports ext4 format.
❶ format SSD to ext4 file system on Ubuntu system.
1ls /dev                              //view the SSD device name
2mke2fs -t ext4 /dev/nvme0n1         //format ssd to ext4 file system on ubuntu OS
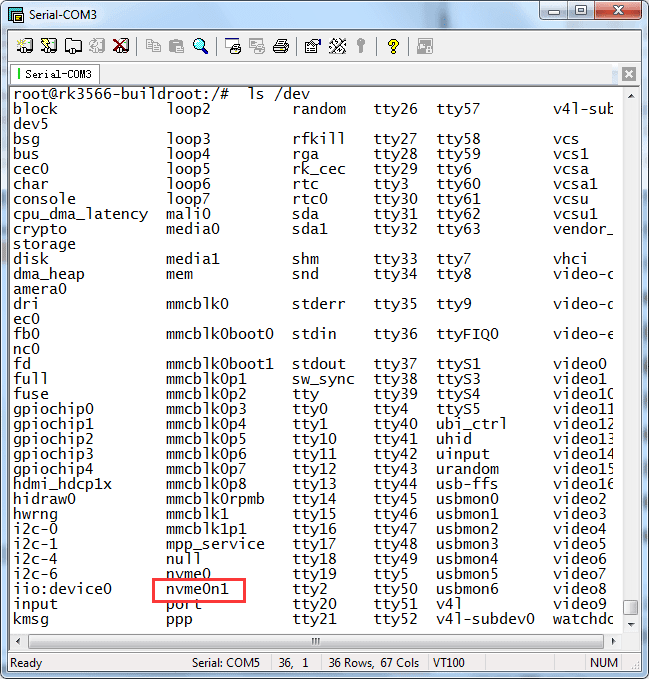
❷ mount SSD and test
1mkdir /mnt/ssd
2mount -t ext4 /dev/nvme0n1 /mnt/ssd  //mount SSD
3ls /mnt/ssd
root@rk3566-buildroot:/# mkdir /mnt/ssd
root@rk3566-buildroot:/# mount -t ext4 /dev/nvme0n1 /mnt/ssd
[  121.417675] EXT4-fs (nvme0n1): recovery complete
[  121.418216] EXT4-fs (nvme0n1): mounted filesystem with ordered data mode. Opts: (null)
root@rk3566-buildroot:/# ls /mnt/ssd
lost+found  rk3588  xihuanni.wav
root@rk3566-buildroot:/#
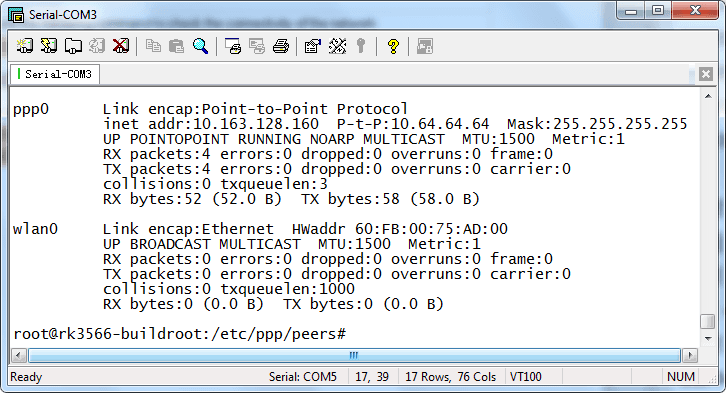
6.12 4G & GPS
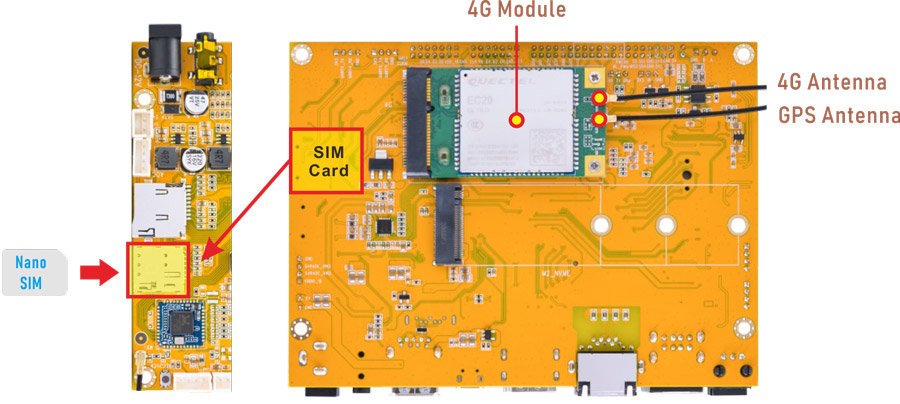
6.12.1 4G
❶ turn off eth0 to avoid DNS conflicts.
1ifconfig eth0 down
❷ realize ppp dialing.
1cd /etc/ppp/peers
2pppd call quectel-ppp &
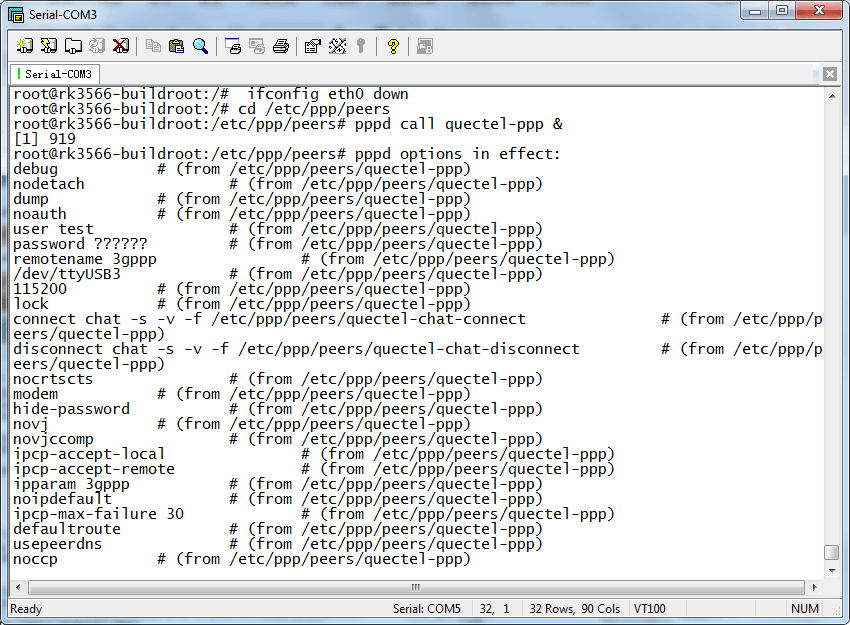
❸ view the network status and ping URL to test.
1ifconfig
2ping www.boardcon.com
6.12.2 GPS
❶ plug the EC20 module to mPCIe socket.
❷ connect GPS antenna.
❸ power on.
❹ execute commands to test GPS.
1echo -e "AT+QGPS=1\r\n" > /dev/ttyUSB2
2cat /dev/ttyUSB1
root@rk3566-buildroot:/# echo -e "AT+QGPS=1\r\n" > /dev/ttyUSB2
root@rk3566-buildroot:/# cat /dev/ttyUSB1
$GPVTG,,T,,M,,N,,K,N*2C

$GPGSA,A,1,,,,,,,,,,,,,,,,*32

$GPGGA,,V,,,,,,,,,,,,,*66

$GPRMC,,V,,,,,,,,,,N*53

$GPVTG,,T,,M,,N,,K,N*2C

$GPGSA,A,1,,,,,,,,,,,,,,,,*32

$GPGGA,,,,,,0,,,,,,,,*66

$GPRMC,,V,,,,,,,,,,N*53
6.13 IR
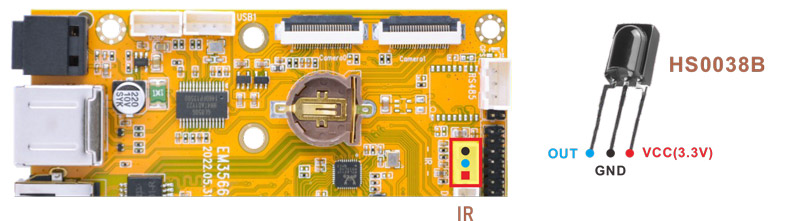
❶ connect IR receiver to the IR port.
❷ turn on IR debugging log.
1echo 1 > /sys/module/rockchip_pwm_remotectl/parameters/code_print
❸ press the Infrared controller, you can view the received datas on the terminal.
root@rk3566-buildroot:/# echo 1 > /sys/module/rockchip_pwm_remotectl/parameters/code_print
[ 217.703846] USERCODE=0xfe01
[ 217.730906] RMC_GETDATA=b8
[ 217.899270] USERCODE=0xfe01
[ 217.926340] RMC_GETDATA=9a
[ 218.061700] USERCODE=0xfe01
[ 218.088776] RMC_GETDATA=b7
6.14 ADC
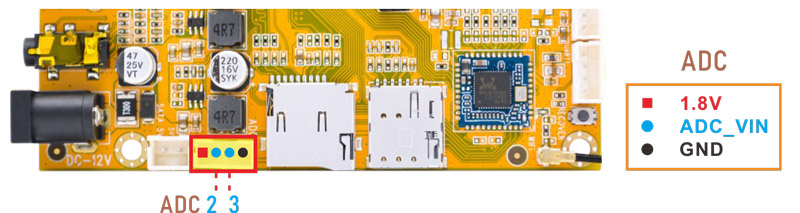
Execute the command to view the SARADC_VIN value when it is in the following states:
floating
connect to GND
connect to VDDIO_18(1.8V)
1cat /sys/devices/platform/fe720000.saradc/iio:device0/in_voltage2_raw
root@rk3566-buildroot:/# cat /sys/devices/platform/fe720000.saradc/iio:device0/in_voltage2_raw
895
root@rk3566-buildroot:/# cat /sys/devices/platform/fe720000.saradc/iio:device0/in_voltage2_raw
18
root@rk3566-buildroot:/# cat /sys/devices/platform/fe720000.saradc/iio:device0/in_voltage2_raw
1023
1cat /sys/devices/platform/fe720000.saradc/iio:device0/in_voltage3_raw
6.15 Camera

EM3566 Camera0 and camera1 share the signal I2C4, Boardcon Android 12 firmware default camera0 is enabled.
❶ connect the camera module (OV13850) to the camera0.
❷ power on.
❸ check camera device number.
1grep ov13850 /sys/class/video4linux/v*/name                 //check camera device number
2grep "" /sys/class/video4linux/v*/name | grep mainpath
❹ preview/ record video/ take photos
1gst-launch-1.0 v4l2src device=/dev/video8 ! video/x-raw,format=NV16,width=1280,height=800, framerate=30/1 ! kmssink      //preview
2gst-launch-1.0 v4l2src device=/dev/video8 num-buffers=100 ! video/x-raw,format=NV12,width=1920,height=1088,framerate=30/1 ! videoconvert ! mpph264enc ! h264parse ! mp4mux ! filesink location=/tmp/h264.mp4        //record video
3gst-launch-1.0 -v v4l2src device=/dev/video8 num-buffers=10 ! video/x-raw,format=NV12,width=1280,height=800 ! mppjpegenc ! multifilesink location=/tmp/test%05d.jpg   //take a picture
The files are saved in /tmp.
1root@rk3566-buildroot:/# ls tmp