6. Debian Application
6.1 Display
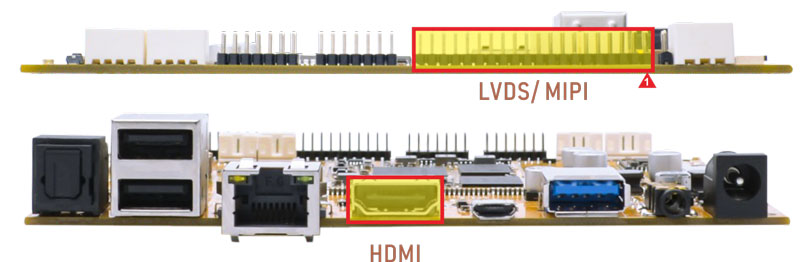
EM3566 supports HDMI/LVDS/MIPI display.
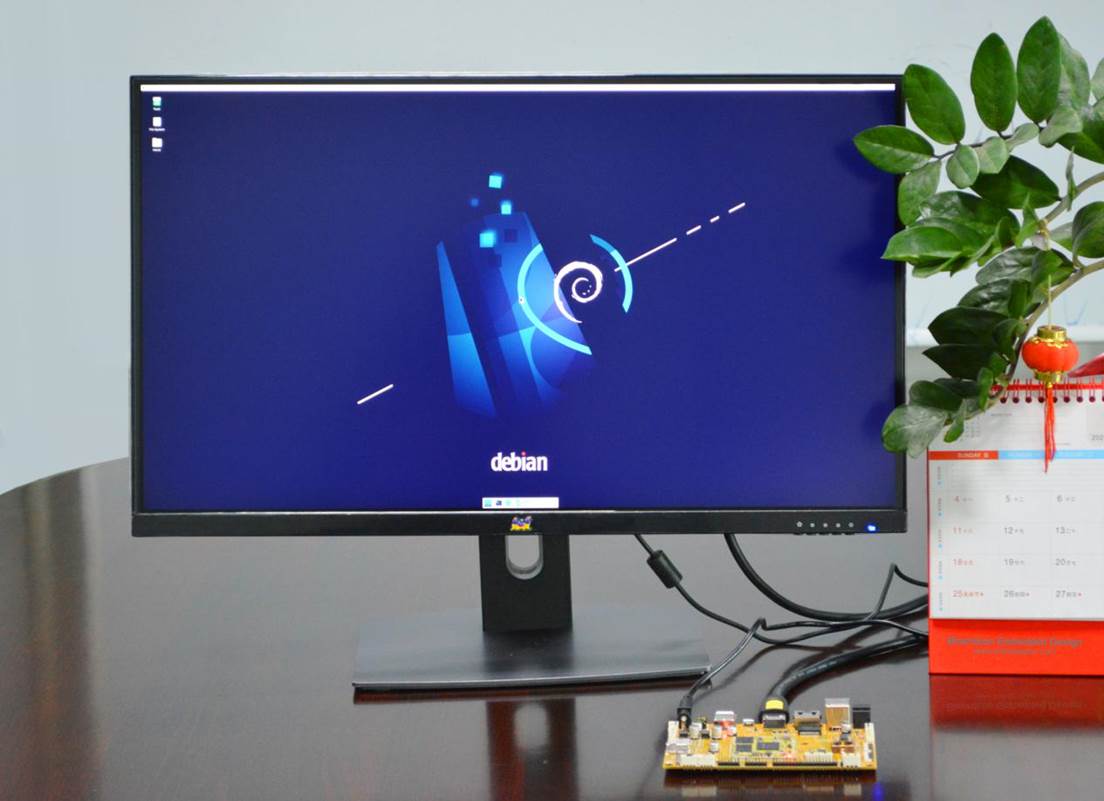
HDMI display
Note
The Boardcon factory default HDMI display. If change to LVDS/MIPI LCD, please reflash the corresponding boot.img.
10.1” MIPI LCD:
boot_10.1inch_mipi.img10.1” LVDS LCD:
boot_10.1inch_lvds.img7” LVDS LCD:
boot_7inch_lvds.imgHDMI:
boot_hdmi.img
6.2 SD Card
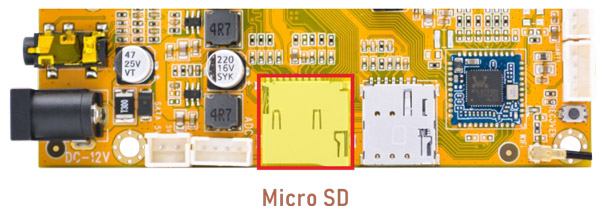
The EM3566 supports SD Hot-plug. After inserting the SD Card, an icon will appear on the desktop. Click the icon to automatically mount the device.
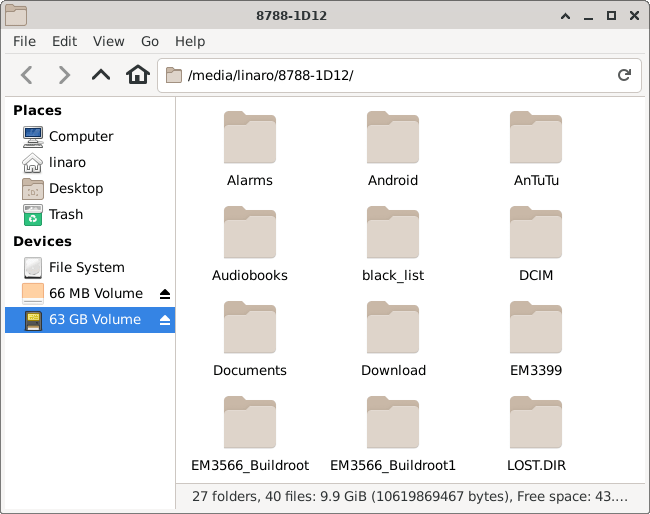
mounted SD Card
6.3 USB
6.3.1 Micro USB
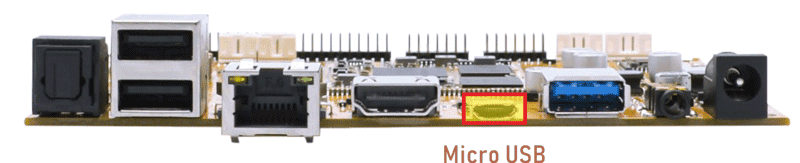
The micro USB is mainly used for firmware upgrades and ADB function.
ADB is the command-line debugging tool. It can use for system logs, uploading and downloading the files, installing the applications, etc.
❶ connect the board and PC host with Micro USB cable.
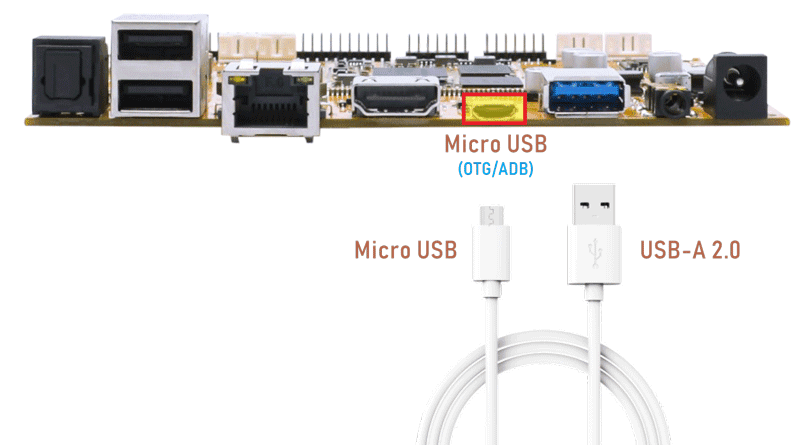
❷ install ADB driver on Windows system.
❸ press Windows + R to open the Run program. Type cmd and press Enter
❹ execute commands to enable ADB and test.
Push the file com located in PC E:\EM3566\Tool\Test\ to the board for example:
1adb push E:\EM3566\Tool\Test\com /system
2adb shell
3chmod 777 /system/com    //modify com properties
6.3.2 USB Host
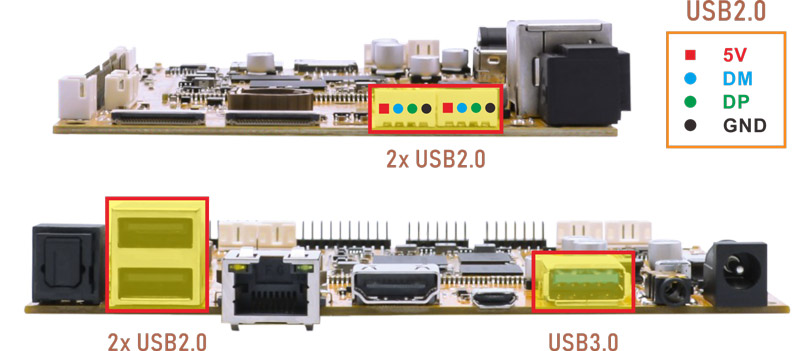
The USB Host can be used to connect USB mouse, USB keyboard, U-Disk or other USB devices.
After inserting the USB flash drive, an icon will appear on the desktop. Click the icon to automatically mount the device.
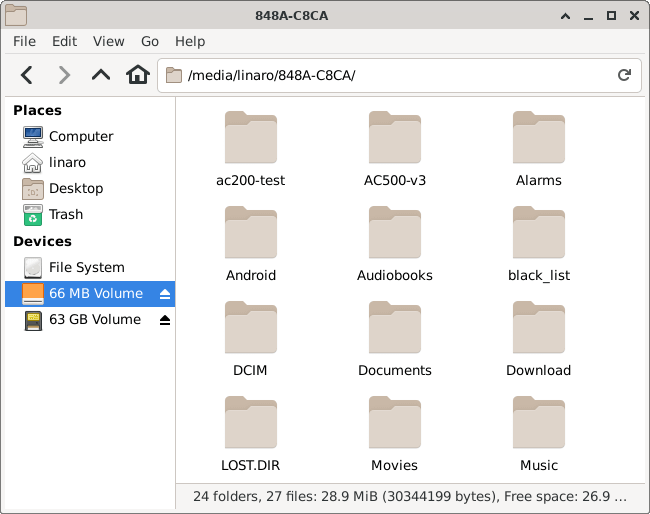
mounted U-disk
USB2.0(high-speed) and USB3.0(SuperSpeed) disk detection:
root@linaro-alip:/# [   62.553766] usb 2-1.2: new high-speed USB device number 3 using ehci-platform
[   62.656096] usb 2-1.2: New USB device found, idVendor=23a9, idProduct=ef18, bcdDevice= 1.00
[   62.656176] usb 2-1.2: New USB device strings: Mfr=1, Product=2, SerialNumber=3
[   62.656204] usb 2-1.2: Product: Teclast CoolFlash
[   62.656227] usb 2-1.2: Manufacturer: Generic
[   62.656248] usb 2-1.2: SerialNumber: 12DE9A41EC364FC0
[   62.658931] usb-storage 2-1.2:1.0: USB Mass Storage device detected
[   62.661927] scsi host0: usb-storage 2-1.2:1.0
[   63.684920] scsi 0:0:0:0: Direct-Access     Teclast  CoolFlash        1.00 PQ: 0 ANSI: 4
[   63.690789] sd 0:0:0:0: [sda] 62947520 512-byte logical blocks: (32.2 GB/30.0 GiB)
[   63.691943] sd 0:0:0:0: [sda] Write Protect is off
[   63.692669] sd 0:0:0:0: [sda] No Caching mode page found
[   63.692691] sd 0:0:0:0: [sda] Assuming drive cache: write through
[   63.712333]  sda: sda1
[   63.715793] sd 0:0:0:0: [sda] Attached SCSI removable disk
root@linaro-alip:/# [  154.169717] usb 2-1.2: USB disconnect, device number 3
root@linaro-alip:/# [  197.867142] usb 6-1: new SuperSpeed Gen 1 USB device number 2 using xhci-hcd
[  197.885700] usb 6-1: New USB device found, idVendor=3535, idProduct=6300, bcdDevice= 1.10
[  197.885765] usb 6-1: New USB device strings: Mfr=1, Product=2, SerialNumber=3
[  197.885784] usb 6-1: Product: U330
[  197.885801] usb 6-1: Manufacturer: aigo
[  197.885816] usb 6-1: SerialNumber: 52A7B285B4956ADF
[  197.888730] usb-storage 6-1:1.0: USB Mass Storage device detected
[  197.890166] scsi host0: usb-storage 6-1:1.0
[  198.911775] scsi 0:0:0:0: Direct-Access     aigo     U330             PMAP PQ: 0 ANSI: 6
[  198.915226] sd 0:0:0:0: [sda] 122880000 512-byte logical blocks: (62.9 GB/58.6 GiB)
[  198.916123] sd 0:0:0:0: [sda] Write Protect is off
[  198.917255] sd 0:0:0:0: [sda] Write cache: disabled, read cache: enabled, doesn't support DPO or FUA
[  199.141922]  sda: sda1
[  199.147127] sd 0:0:0:0: [sda] Attached SCSI removable disk
6.4 Video Player
Copy video file to SD card/U-disk then insert it to the board. After system boot execute the command to test.
6.4.1 Test 1080P
1gst-play-1.0 --flags=3 --videosink=xvimagesink /usr/local/test.mp4
test.mp4 is the built-in video file.
root@linaro-alip:/# gst-play-1.0 --flags=3 --videosink=xvimagesink /usr/local/test.mp4
Press 'k' to see a list of keyboard shortcuts.
Now playing /usr/local/test.mp4
Redistribute latency...
0:00:06.1 / 0:00:10.0
or
1gst-play-1.0 --videosink=xvimagesink /XXX //`XXX` is vedio file path
Play 1080p_h264.mp4 in /media/linaro/New/ for example:
root@linaro-alip:/# gst-play-1.0 --videosink=xvimagesink /media/linaro/New/1080p_h264.mp4
Press 'k' to see a list of keyboard shortcuts.
Now playing /media/linaro/New/1080p_h264.mp4
Redistribute latency...
0:00:07.4 / 0:09:56.4
6.4.2 Test 4K
1export GST_MPP_VIDEODEC_DEFAULT_ARM_AFBC=1            //set AFBC
2cat /sys/kernel/debug/dri/0/state | grep "plane\["
3GST_DEBUG=*mpp*:4 gst-play-1.0 --flags=3 --videosink="kmssink plane-id=70" /XXX      //`XXX` is vedio file path
4GST_DEBUG=*mpp*:4 gst-play-1.0 --flags=3 --videosink="kmssink plane-id=70" /XXX --audiosink="alsasink device=hw:1,0"         //specify audio channel output
Play 4K.mp4 in /media/linaro/KINGSTON/ for example:
root@linaro-alip:/# export GST_MPP_VIDEODEC_DEFAULT_ARM_AFBC=1
root@linaro-alip:/# cat /sys/kernel/debug/dri/0/state | grep "plane\["
plane[56]: Smart0-win0
plane[70]: Cluster0-win0
plane[92]: Esmart0-win0
root@linaro-alip:/# GST_DEBUG=*mpp*:4 gst-play-1.0 --flags=3 --videosink="kmssink plane-id=70" /media/linaro/KINGSTON/4K.mp4
Press 'k' to see a list of keyboard shortcuts.
Now playing /media/linaro/KINGSTON/4K.mp4
0:00:01.382141889  1886   0x7f7c00ff00 INFO                  mppdec gstmppdec.c:519:gst_mpp_dec_apply_info_change:<mppvideodec0> applying NV12(AFBC) 3840x2160 (3840x2176)
0:00:01.424988310  1886   0x7f7c00ff00 INFO                  mppdec gstmppdec.c:943:gst_mpp_dec_loop:<mppvideodec0> video info changed
0:00:01.425223102  1886   0x7f7c00ff00 WARN                  mppdec gstmppdec.c:590:gst_mpp_dec_get_frame:<mppvideodec0> MPP is not able to generate pts
Redistribute latency...
0:00:40.2 / 0:18:47.1
Specify audio channel output:
root@linaro-alip:/# GST_DEBUG=*mpp*:4 gst-play-1.0 --flags=3 --videosink="kmssink plane-id=70" /media/linaro/KINGSTON/4K.mp4 --audiosink="alsasink device=hw:1,0"
Press 'k' to see a list of keyboard shortcuts.
Now playing /media/linaro/KINGSTON/4K.mp4
0:00:01.331122175  1909   0x7f78010f00 INFO                  mppdec gstmppdec.c:519:gst_mpp_dec_apply_info_change:<mppvideodec0> applying NV12(AFBC) 3840x2160 (3840x2176)
WARNING No volume control found
WARNING debug information: ../gst/playback/gstplaysink.c(2893): gen_audio_chain (): /GstPlayBin:playbin/GstPlaySink:playsink:
Volume/mute is not available
0:00:01.371058638  1909   0x7f78010f00 INFO                  mppdec gstmppdec.c:943:gst_mpp_dec_loop:<mppvideodec0> video info changed
0:00:01.371251138  1909   0x7f78010f00 WARN                  mppdec gstmppdec.c:590:gst_mpp_dec_get_frame:<mppvideodec0> MPP is not able to generate pts
Redistribute latency...
0:00:18.1 / 0:18:47.
6.5 Ethernet

Connect the Board and router with an Ethernet cable (default DHCP=Yes). User can ping URL/IP at terminal, or open the browser to test Network.
1ifconfig
2ping www.boardcon.com
root@linaro-alip:/# ifconfig
eth0: flags=4163<UP,BROADCAST,RUNNING,MULTICAST>  mtu 1500
        inet 192.168.0.216  netmask 255.255.255.0  broadcast 192.168.0.255
        inet6 fe80::2c87:301a:143f:691c  prefixlen 64  scopeid 0x20<link>
        ether 42:e2:e5:83:87:e3  txqueuelen 1000  (Ethernet)
        RX packets 33  bytes 3277 (3.2 KiB)
        RX errors 0  dropped 1  overruns 0  frame 0
        TX packets 11  bytes 1424 (1.3 KiB)
        TX errors 0  dropped 0 overruns 0  carrier 0  collisions 0
        device interrupt 50

lo: flags=73<UP,LOOPBACK,RUNNING>  mtu 65536
        inet 127.0.0.1  netmask 255.0.0.0
        inet6 ::1  prefixlen 128  scopeid 0x10<host>
        loop  txqueuelen 1000  (Local Loopback)
        RX packets 960  bytes 94080 (91.8 KiB)
        RX errors 0  dropped 0  overruns 0  frame 0
        TX packets 960  bytes 94080 (91.8 KiB)
        TX errors 0  dropped 0 overruns 0  carrier 0  collisions 0

p2p0: flags=4099<UP,BROADCAST,MULTICAST>  mtu 1500
        ether 62:fb:00:75:ac:f8  txqueuelen 1000  (Ethernet)
        RX packets 0  bytes 0 (0.0 B)
        RX errors 0  dropped 0  overruns 0  frame 0
        TX packets 0  bytes 0 (0.0 B)
        TX errors 0  dropped 0 overruns 0  carrier 0  collisions 0

wlan0: flags=4099<UP,BROADCAST,MULTICAST>  mtu 1500
        ether 60:fb:00:75:ac:f8  txqueuelen 1000  (Ethernet)
        RX packets 0  bytes 0 (0.0 B)
        RX errors 0  dropped 0  overruns 0  frame 0
        TX packets 0  bytes 0 (0.0 B)
        TX errors 0  dropped 0 overruns 0  carrier 0  collisions 0
root@linaro-alip:/# ping www.boardcon.com
PING www.boardcon.com (67.222.54.196) 56(84) bytes of data.
64 bytes from 67-222-54-196.unifiedlayer.com (67.222.54.196): icmp_seq=1 ttl=48 time=188 ms
64 bytes from 67-222-54-196.unifiedlayer.com (67.222.54.196): icmp_seq=2 ttl=48 time=188 ms
64 bytes from 67-222-54-196.unifiedlayer.com (67.222.54.196): icmp_seq=3 ttl=48 time=188 ms
64 bytes from 67-222-54-196.unifiedlayer.com (67.222.54.196): icmp_seq=4 ttl=48 time=188 ms
64 bytes from 67-222-54-196.unifiedlayer.com (67.222.54.196): icmp_seq=5 ttl=48 time=188 ms
64 bytes from 67-222-54-196.unifiedlayer.com (67.222.54.196): icmp_seq=6 ttl=48 time=188 ms
64 bytes from 67-222-54-196.unifiedlayer.com (67.222.54.196): icmp_seq=7 ttl=48 time=187 ms
^C
--- www.boardcon.com ping statistics ---
7 packets transmitted, 7 received, 0% packet loss, time 10316ms
rtt min/avg/max/mdev = 187.422/187.759/188.116/0.253 ms
6.6 Audio I/O
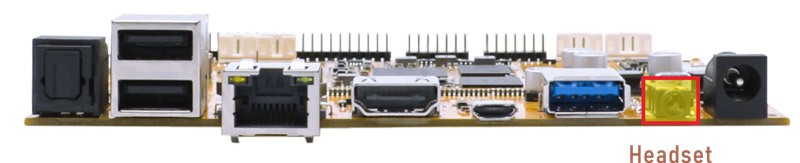
❶ plug the Headset into the 3.5mm Audio jack.
❷ excute the commands to record and play.
1aplay -l                                                    //view sound card devices
2arecord -Dhw:1,0 -d 10 -f cd -r 44100 -c 2 -t wav test.wav  //record and save as test.wav
3aplay test.wav                                              //play test.wav and output via HDMI
4aplay -Dhw:1,0 test.wav                                     //output via headphone
root@linaro-alip:/# aplay -l
**** List of PLAYBACK Hardware Devices ****
card 0: rockchiphdmi [rockchip,hdmi], device 0: fe400000.i2s-i2s-hifi i2s-hifi-0 [fe400000.i2s-i2s-hifi i2s-hifi-0]
  Subdevices: 1/1
  Subdevice #0: subdevice #0
card 1: rockchipes8388c [rockchip,es8388-codec], device 0: fe410000.i2s-ES8323 HiFi ES8323.1-0010-0 [fe410000.i2s-ES8323 HiFi ES8323.1-0010-0]
  Subdevices: 1/1
  Subdevice #0: subdevice #0
root@linaro-alip:/# arecord -Dhw:1,0 -d 10 -f cd -r 44100 -c 2 -t wav test.wav
Recording WAVE 'test.wav' : Signed 16 bit Little Endian, Rate 44100 Hz, Stereo
root@linaro-alip:/# aplay test.wav
Playing WAVE 'test.wav' : Signed 16 bit Little Endian, Rate 44100 Hz, Stereo
root@linaro-alip:/# aplay -Dhw:1,0 test.wav
Playing WAVE 'test.wav' : Signed 16 bit Little Endian, Rate 44100 Hz, Stereo
6.7 RTC
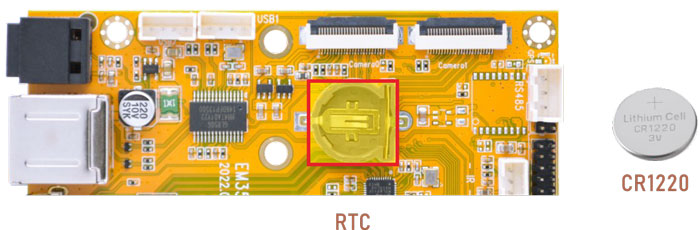
❶ insert a CR1220 battery before test. It keeps the time running when the main power is off.
❷ set date and time.
1date -s "2024-12-30 10:30:00"      //set system date
2hwclock -w                   //set the hardware clock to current system time
3hwclock
root@linaro-alip:/# date -s "2024-12-30 10:30:00"
Mon 30 Dec 2024 10:30:00 AM UTC
root@linaro-alip:/# hwclock -w
root@linaro-alip:/# hwclock
2024-12-30 10:30:16.203450+00:00
root@linaro-alip:/# hwclock
2024-12-30 10:31:47.870539+00:00
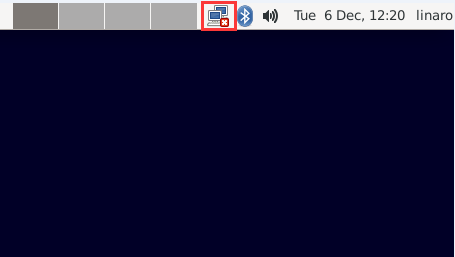
6.8 WiFi & Bluetooth
6.8.1 WiFi
❶ connect the WiFi antenna.
❷ click the network icon in the top right corner of the UI interface.
❸ select the SSID from the list of available networks and enter the password.
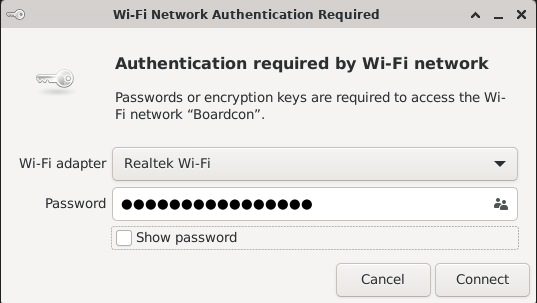
After connected, user can ping URL/IP at terminal.
1ifconfig
2ping www.boardcon.com
root@linaro-alip:/# ifconfig
eth0: flags=4099<UP,BROADCAST,MULTICAST>  mtu 1500
        ether 42:e2:e5:83:87:e3  txqueuelen 1000  (Ethernet)
        RX packets 0  bytes 0 (0.0 B)
        RX errors 0  dropped 0  overruns 0  frame 0
        TX packets 0  bytes 0 (0.0 B)
        TX errors 0  dropped 0 overruns 0  carrier 0  collisions 0
        device interrupt 50

lo: flags=73<UP,LOOPBACK,RUNNING>  mtu 65536
        inet 127.0.0.1  netmask 255.0.0.0
        inet6 ::1  prefixlen 128  scopeid 0x10<host>
        loop  txqueuelen 1000  (Local Loopback)
        RX packets 534  bytes 53860 (52.5 KiB)
        RX errors 0  dropped 0  overruns 0  frame 0
        TX packets 534  bytes 53860 (52.5 KiB)
        TX errors 0  dropped 0 overruns 0  carrier 0  collisions 0

p2p0: flags=4099<UP,BROADCAST,MULTICAST>  mtu 1500
        ether 62:fb:00:75:ac:f8  txqueuelen 1000  (Ethernet)
        RX packets 1690  bytes 232899 (227.4 KiB)
        RX errors 0  dropped 199  overruns 0  frame 0
        TX packets 54  bytes 6734 (6.5 KiB)
        TX errors 0  dropped 0 overruns 0  carrier 0  collisions 0

wlan0: flags=4163<UP,BROADCAST,RUNNING,MULTICAST>  mtu 1500
        inet 192.168.0.213  netmask 255.255.255.0  broadcast 192.168.0.255
        inet6 fe80::4243:8705:4307:baf4  prefixlen 64  scopeid 0x20<link>
        ether 60:fb:00:75:ac:f8  txqueuelen 1000  (Ethernet)
        RX packets 1762  bytes 250608 (244.7 KiB)
        RX errors 0  dropped 224  overruns 0  frame 0
        TX packets 322  bytes 27805 (27.1 KiB)
        TX errors 0  dropped 0 overruns 0  carrier 0  collisions 0

root@linaro-alip:/# ping www.boardcon.com
PING www.boardcon.com (67.222.54.196) 56(84) bytes of data.
64 bytes from 67-222-54-196.unifiedlayer.com (67.222.54.196): icmp_seq=1 ttl=48 time=193 ms
64 bytes from 67-222-54-196.unifiedlayer.com (67.222.54.196): icmp_seq=2 ttl=48 time=243 ms
64 bytes from 67-222-54-196.unifiedlayer.com (67.222.54.196): icmp_seq=3 ttl=48 time=239 ms
64 bytes from 67-222-54-196.unifiedlayer.com (67.222.54.196): icmp_seq=4 ttl=48 time=1859 ms
64 bytes from 67-222-54-196.unifiedlayer.com (67.222.54.196): icmp_seq=5 ttl=48 time=1047 ms
64 bytes from 67-222-54-196.unifiedlayer.com (67.222.54.196): icmp_seq=6 ttl=48 time=194 ms
^C
--- www.boardcon.com ping statistics ---
7 packets transmitted, 6 received, 14.2857% packet loss, time 6012ms
rtt min/avg/max/mdev = 192.657/629.124/1859.215/628.311 ms, pipe 2
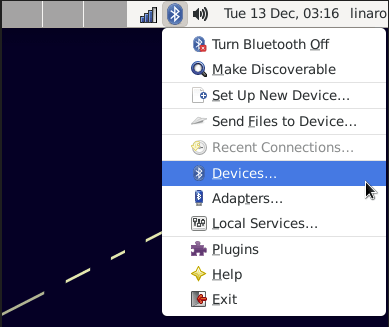
6.8.2 Bluetooth
❶ click the Buletooth icon in the top right corner of the UI interface.
❷ click Search and select the available device in the list to pair.
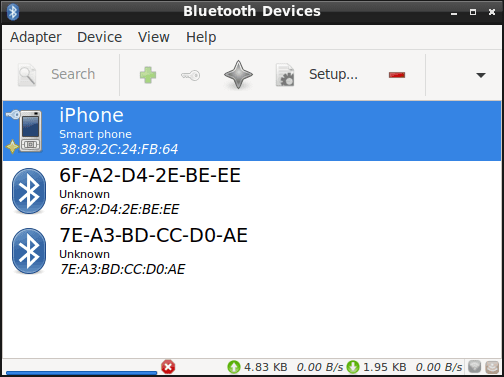
Available device
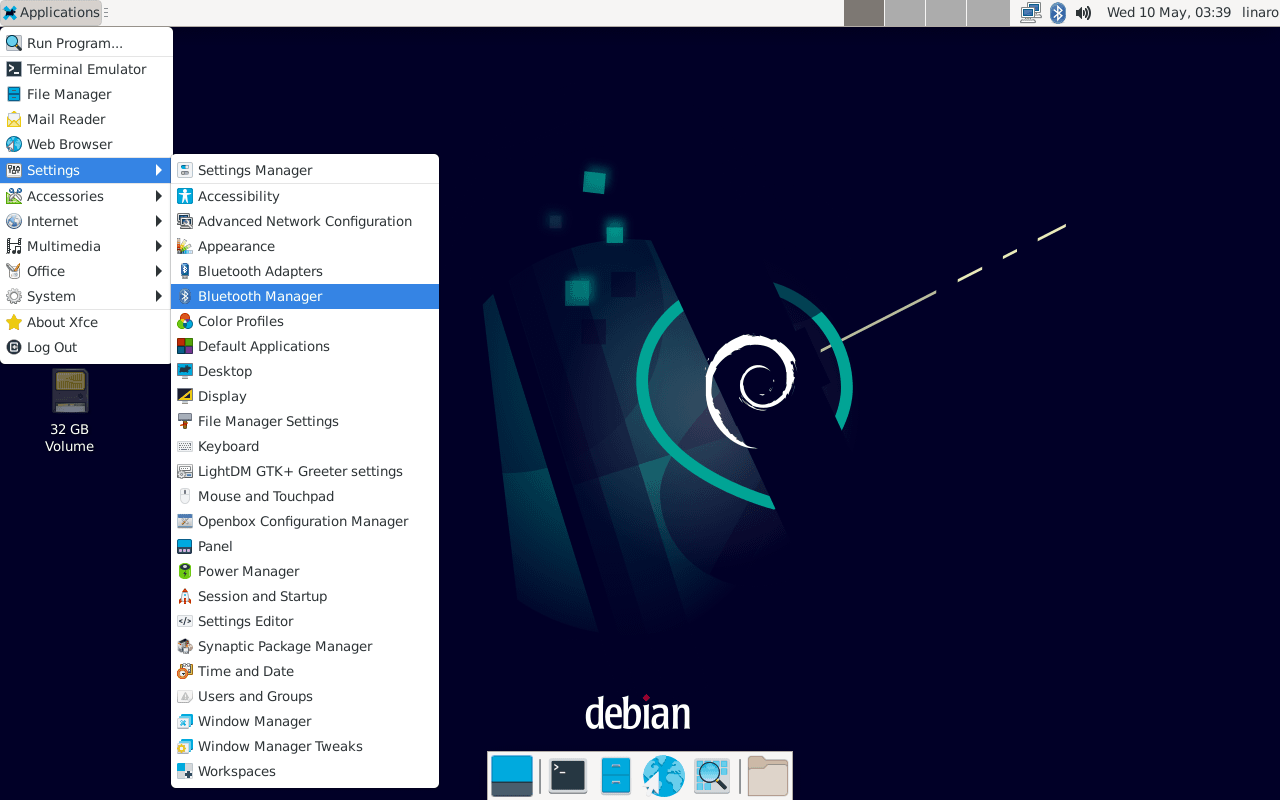
or click Applications -> Settings -> Bluetooth Manager to search and pair Bluetooth devices.
6.9 RS485
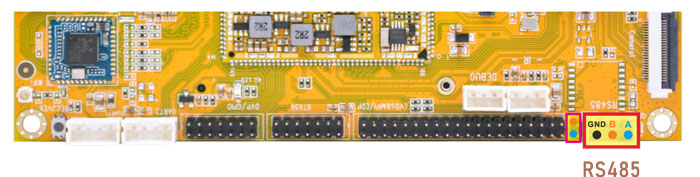
❶ push the file com to the board via ADB
❷ connect PC and board with USB-to-RS485 adapter.
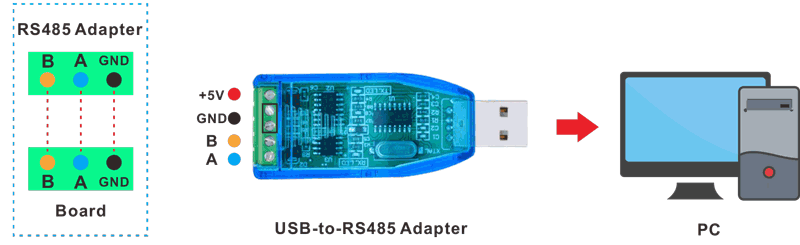
RS485 connection
❸ open the Serial Terminal and set baud rate for the board and RS485 adapter respectively.
Baud rate: board - 1500000; RS485 adapter - 115200
❹ execute command on the terminal serial port of the board.
1./system/com /dev/ttyS3 115200 8 0 1
❺ input character to test RS485 communication.
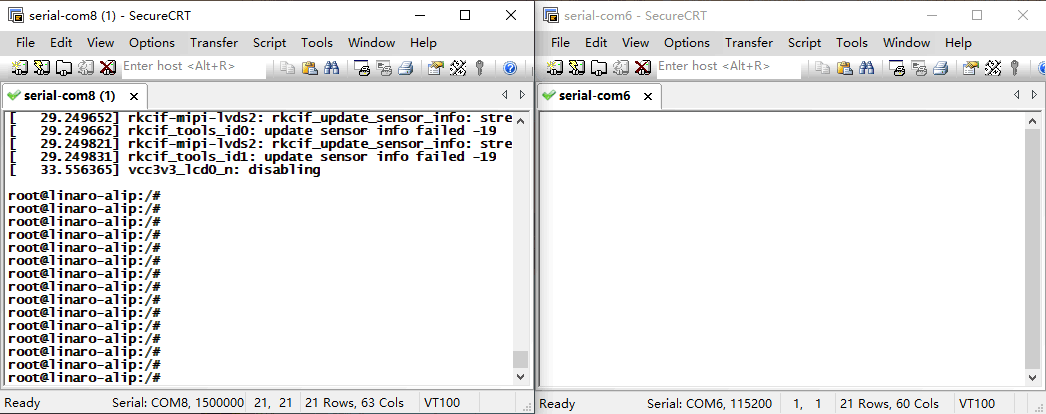
6.10 UART
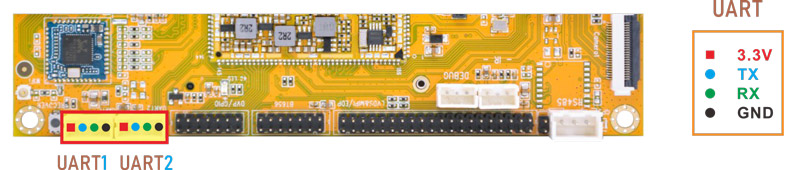
The UART loopback test is for reference only.
❶ push the file com to the board via ADB
❷ connect the transmit (TX) pin to the receive (RX) pin of UART.
❸ execute the command in the terminal.
1./system/com /dev/ttyS4 115200 8 0 1 //test UART4
❹ input character to test UART.
root@linaro-alip:/# ./system/com /dev/ttyS4 115200 8 0 1
port = /dev/ttyS4
baudrate = 115200
cs = 8
parity = 0
stopb = 1
1234567890
RECV: 1234567890
abcdefg
RECV: abcdefg
❺ press Ctrl + C to exit UART4 testing, execute the command to test UART5.
1./system/com /dev/ttyS5 115200 8 0 1 //test UART5
root@linaro-alip:/# ./system/com /dev/ttyS5 115200 8 0 1
port = /dev/ttyS5
baudrate = 115200
cs = 8
parity = 0
stopb = 1
123456789999
RECV: 123456789999
abcdefghijk
RECV: abcdefghijk
6.11 M.2 SSD

EM3566 only supports ext4 format. Format SSD to ext4 file system on Ubuntu system first.
❶ view the SSD device name.
1ls /dev/block/
❷ format SSD on Ubuntu system.
1mke2fs -t ext4 /dev/block/nvme0n1
❸ mount SSD and test.
1mkdir /mnt/ssd                          //create a Mount Point
2mount -t ext4 /dev/nvme0n1 /mnt/ssd     //mount SSD
3ls /mnt/ssd
root@linaro-alip:/# mkdir /mnt/ssd
root@linaro-alip:/# mount -t ext4 /dev/nvme0n1 /mnt/ssd
[  147.097314] EXT4-fs (nvme0n1): recovery complete
[  147.097490] EXT4-fs (nvme0n1): mounted filesystem with ordered data mode.
Opts: (null)
root@linaro-alip:/# ls /mnt/ssd
2.wav  lost+found  test2  yang.mp3
root@linaro-alip:/#
6.12 4G & GPS
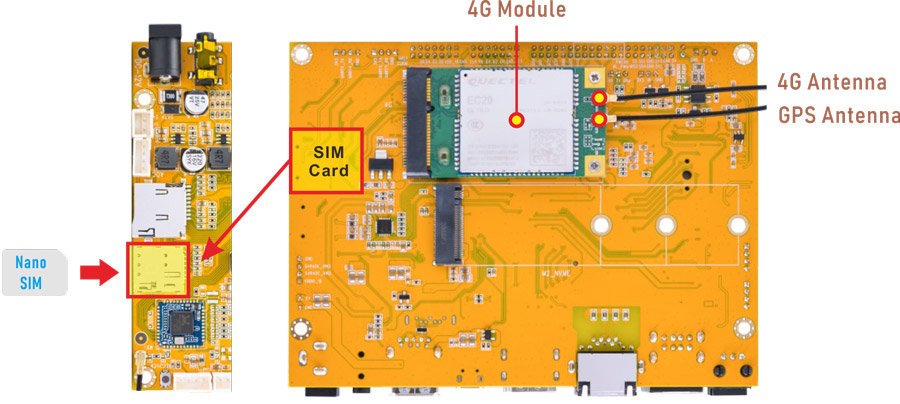
6.12.1 4G
❶ insert 4G module to PCIe slot (4G model: EC20/EC25).
❷ connect antenna and insert SIM card.
❸ power on. Execute commands to connect 4G network.
1ifconfig eth0 down              //turn off eth0 to avoid DNS conflicts
2cd  /etc/ppp/peers
3pppd call quectel-ppp &         //realize ppp dialing
root@linaro-alip:/# ifconfig eth0 down
root@linaro-alip:/# cd /etc/ppp/peers
root@linaro-alip:/etc/ppp/peers# pppd call quectel-ppp &
[1] 1907
root@linaro-alip:/etc/ppp/peers# pppd options in effect:
debug           # (from /etc/ppp/peers/quectel-ppp)
nodetach                # (from /etc/ppp/peers/quectel-ppp)
dump            # (from /etc/ppp/peers/quectel-ppp)
noauth          # (from /etc/ppp/peers/quectel-ppp)
user test               # (from /etc/ppp/peers/quectel-ppp)
password ??????         # (from /etc/ppp/peers/quectel-ppp)
remotename 3gppp                # (from /etc/ppp/peers/quectel-ppp)
/dev/ttyUSB3            # (from /etc/ppp/peers/quectel-ppp)
115200          # (from /etc/ppp/peers/quectel-ppp)
lock            # (from /etc/ppp/peers/quectel-ppp)
connect chat -s -v -f /etc/ppp/peers/quectel-chat-connect               # (from /etc/ppp/peers/quectel-ppp)
disconnect chat -s -v -f /etc/ppp/peers/quectel-chat-disconnect         # (from /etc/ppp/peers/quectel-ppp)
nocrtscts               # (from /etc/ppp/peers/quectel-ppp)
modem           # (from /etc/ppp/peers/quectel-ppp)
asyncmap 0              # (from /etc/ppp/options)
lcp-echo-failure 4              # (from /etc/ppp/options)
lcp-echo-interval 30            # (from /etc/ppp/options)
hide-password           # (from /etc/ppp/peers/quectel-ppp)
novj            # (from /etc/ppp/peers/quectel-ppp)
novjccomp               # (from /etc/ppp/peers/quectel-ppp)
ipcp-accept-local               # (from /etc/ppp/peers/quectel-ppp)
ipcp-accept-remote              # (from /etc/ppp/peers/quectel-ppp)
ipparam 3gppp           # (from /etc/ppp/peers/quectel-ppp)
noipdefault             # (from /etc/ppp/peers/quectel-ppp)
ipcp-max-failure 30             # (from /etc/ppp/peers/quectel-ppp)
defaultroute            # (from /etc/ppp/peers/quectel-ppp)
usepeerdns              # (from /etc/ppp/peers/quectel-ppp)
noccp           # (from /etc/ppp/peers/quectel-ppp)
noipx           # (from /etc/ppp/options)
abort on (BUSY)
abort on (NO CARRIER)
abort on (NO DIALTONE)
abort on (ERROR)
abort on (NO ANSWER)
timeout set to 30 seconds
send (AT^M)
expect (OK)
^M
OK
 -- got it

send (ATE0^M)
expect (OK)
^M
^M
OK
 -- got it

send (ATI;+CSUB;+CSQ;+CPIN?;+COPS?;+CGREG?;&D2^M)
expect (OK)
^M
^M
Quectel^M
EC25^M
Revision: EC25EUXGAR08A17M1G^M
^M
SubEdition: V01^M
^M
+CSQ: 27,99^M
^M
+CPIN: READY^M
^M
+COPS: 0,0,"Suning\00",7^M
^M
+CGREG: 0,1^M
^M
OK
 -- got it

send (AT+CGDCONT=1,"IP","3gnet",,0,0^M)
expect (OK)
^M
^M
OK
 -- got it

send (ATD*99#^M)
expect (CONNECT)
^M
^M
CONNECT
 -- got it

Script chat -s -v -f /etc/ppp/peers/quectel-chat-connect finished (pid 1908), status = 0x0
Serial connection established.
using channel 2
Using interface ppp0
Connect: ppp0 <--> /dev/ttyUSB3
sent [LCP ConfReq id=0x1 <asyncmap 0x0> <magic 0x7cb15bc4> <pcomp> <accomp>]
rcvd [LCP ConfReq id=0x2 <asyncmap 0x0> <auth chap MD5> <magic 0xd0f81a87> <pcomp> <accomp>]
sent [LCP ConfAck id=0x2 <asyncmap 0x0> <auth chap MD5> <magic 0xd0f81a87> <pcomp> <accomp>]
rcvd [LCP ConfAck id=0x1 <asyncmap 0x0> <magic 0x7cb15bc4> <pcomp> <accomp>]
sent [LCP EchoReq id=0x0 magic=0x7cb15bc4]
rcvd [LCP DiscReq id=0x3 magic=0xd0f81a87]
rcvd [CHAP Challenge id=0x1 <56f66b9a9adba96d3f29165b5a2fb6ab>, name = "UMTS_CHAP_SRVR"]
sent [CHAP Response id=0x1 <9065a8e7d006626402368c8800987974>, name = "test"]
rcvd [LCP EchoRep id=0x0 magic=0xd0f81a87 7c b1 5b c4]
rcvd [CHAP Success id=0x1 ""]
CHAP authentication succeeded
CHAP authentication succeeded
sent [IPCP ConfReq id=0x1 <addr 0.0.0.0> <ms-dns1 0.0.0.0> <ms-dns2 0.0.0.0>]
sent [IPV6CP ConfReq id=0x1 <addr fe80::9996:8945:5726:0cb6>]
rcvd [IPCP ConfReq id=0x2]
sent [IPCP ConfNak id=0x2 <addr 0.0.0.0>]
rcvd [IPCP ConfNak id=0x1 <addr 10.67.197.62> <ms-dns1 120.80.80.80> <ms-dns2 221.5.88.88>]
sent [IPCP ConfReq id=0x2 <addr 10.67.197.62> <ms-dns1 120.80.80.80> <ms-dns2 221.5.88.88>]
rcvd [IPCP ConfReq id=0x3]
sent [IPCP ConfAck id=0x3]
rcvd [IPCP ConfAck id=0x2 <addr 10.67.197.62> <ms-dns1 120.80.80.80> <ms-dns2 221.5.88.88>]
Could not determine remote IP address: defaulting to 10.64.64.64
Script /etc/ppp/ip-pre-up started (pid 1917)
Script /etc/ppp/ip-pre-up finished (pid 1917), status = 0x0
local  IP address 10.67.197.62
remote IP address 10.64.64.64
primary   DNS address 120.80.80.80
secondary DNS address 221.5.88.88
Script /etc/ppp/ip-up started (pid 1920)
Script /etc/ppp/ip-up finished (pid 1920), status = 0x0
sent [IPV6CP ConfReq id=0x1 <addr fe80::9996:8945:5726:0cb6>]
IPV6CP: timeout sending Config-Requests
^C
❹ ping URL/IP at terminal to test Network.
1ifconfig                        //view network interface status
2ping www.boardcon.com           //ping URL
root@linaro-alip:/etc/ppp/peers# ifconfig
lo: flags=73<UP,LOOPBACK,RUNNING>  mtu 65536
        inet 127.0.0.1  netmask 255.0.0.0
        inet6 ::1  prefixlen 128  scopeid 0x10<host>
        loop  txqueuelen 1000  (Local Loopback)
        RX packets 954  bytes 97140 (94.8 KiB)
        RX errors 0  dropped 0  overruns 0  frame 0
        TX packets 954  bytes 97140 (94.8 KiB)
        TX errors 0  dropped 0 overruns 0  carrier 0  collisions 0

p2p0: flags=4099<UP,BROADCAST,MULTICAST>  mtu 1500
        ether 62:fb:00:75:ac:f8  txqueuelen 1000  (Ethernet)
        RX packets 1794  bytes 297754 (290.7 KiB)
        RX errors 0  dropped 386  overruns 0  frame 0
        TX packets 490  bytes 36543 (35.6 KiB)
        TX errors 0  dropped 0 overruns 0  carrier 0  collisions 0

ppp0: flags=4305<UP,POINTOPOINT,RUNNING,NOARP,MULTICAST>  mtu 1500
        inet 10.67.197.62  netmask 255.255.255.255  destination 10.64.64.64
        ppp  txqueuelen 3  (Point-to-Point Protocol)
        RX packets 4  bytes 52 (52.0 B)
        RX errors 0  dropped 0  overruns 0  frame 0
        TX packets 14  bytes 198 (198.0 B)
        TX errors 0  dropped 0 overruns 0  carrier 0  collisions 0

wlan0: flags=4099<UP,BROADCAST,MULTICAST>  mtu 1500
        ether 60:fb:00:75:ac:f8  txqueuelen 1000  (Ethernet)
        RX packets 0  bytes 349554 (341.3 KiB)
        RX errors 0  dropped 385  overruns 0  frame 0
        TX packets 0  bytes 4813 (4.7 KiB)
        TX errors 0  dropped 0 overruns 0  carrier 0  collisions 0
root@linaro-alip:/etc/ppp/peers# ping www.boardcon.com
PING www.boardcon.com (67.222.54.196) 56(84) bytes of data.
64 bytes from 67-222-54-196.unifiedlayer.com (67.222.54.196): icmp_seq=1 ttl=46 time=268 ms
64 bytes from 67-222-54-196.unifiedlayer.com (67.222.54.196): icmp_seq=2 ttl=46 time=280 ms
64 bytes from 67-222-54-196.unifiedlayer.com (67.222.54.196): icmp_seq=3 ttl=46 time=313 ms
64 bytes from 67-222-54-196.unifiedlayer.com (67.222.54.196): icmp_seq=4 ttl=46 time=418 ms
64 bytes from 67-222-54-196.unifiedlayer.com (67.222.54.196): icmp_seq=5 ttl=46 time=520 ms
^C
--- www.boardcon.com ping statistics ---
5 packets transmitted, 5 received, 0% packet loss, time 4003ms
rtt min/avg/max/mdev = 267.699/359.719/519.579/95.915 ms
6.12.2 GPS
❶ plug the EC20 module to mPCIe socket.
❷ connect GPS antenna.
❸ power on.
❹ execute commands to test GPS.
1echo -e "AT+QGPS=1\r\n" > /dev/ttyUSB2
2cat /dev/ttyUSB1
root@linaro-alip:/# echo -e "AT+QGPS=1\r\n" > /dev/ttyUSB2
root@linaro-alip:/# cat /dev/ttyUSB1
$GPVTG,,T,,M,,N,,K,N*2C

$GPGSA,A,1,,,,,,,,,,,,,,,,*1E

$GPGGA,,,,,,0,,,,,,,,*66

$GPRMC,,V,,,,,,,,,,N*53

$GPVTG,,T,,M,,N,,K,N*2C

$GPGSA,A,1,,,,,,,,,,,,,,,,*1E

$GPGGA,,,,,,0,,,,,,,,*66
6.13 IR
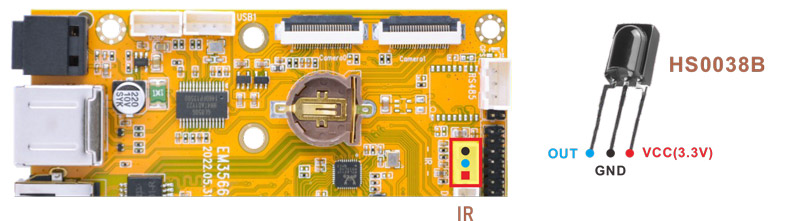
❶ connect IR receiver to the IR port.
❷ turn on IR debugging log.
1echo 1 > /sys/module/rockchip_pwm_remotectl/parameters/code_print
❸ press the Infrared controller, you can view the received datas on the terminal.
root@linaro-alip:/# echo 1 > /sys/module/rockchip_pwm_remotectl/parameters/code_print
root@linaro-alip:/# [   60.031469] USERCODE=0xfe01
[   60.058533] RMC_GETDATA=ea
[   62.325287] USERCODE=0xfe01
[   62.352254] RMC_GETDATA=b8
[   62.837962] USERCODE=0xfe01
[   62.865063] RMC_GETDATA=b9
[   65.497958] USERCODE=0xfe01
[   65.524972] RMC_GETDATA=e7
6.14 ADC
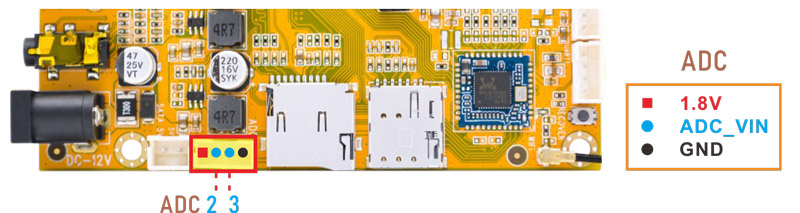
Execute the command to view the SARADC_VIN value when it is in the following states:
floating
connect to GND
connect to VDDIO_18(1.8V)
1cat /sys/devices/platform/fe720000.saradc/iio:device0/in_voltage2_raw
root@linaro-alip:/# cat /sys/devices/platform/fe720000.saradc/iio:device0/in_voltage2_raw
892
root@linaro-alip:/# cat /sys/devices/platform/fe720000.saradc/iio:device0/in_voltage2_raw
13
root@linaro-alip:/# cat /sys/devices/platform/fe720000.saradc/iio:device0/in_voltage2_raw
1023
1cat /sys/devices/platform/fe720000.saradc/iio:device0/in_voltage3_raw
6.15 Camera

EM3566 Camera0 and camera1 share the signal I2C4, Boardcon Android 12 firmware default camera0 is enabled.
❶ connect the camera module (OV13850) to the camera0.
❷ power on.
❸ check camera device number.
1grep ov13850 /sys/class/video4linux/v*/name                 //check camera device number
2grep "" /sys/class/video4linux/v*/name | grep mainpath
root@linaro-alip:/# grep ov13850 /sys/class/video4linux/v*/name
/sys/class/video4linux/v4l-subdev5/name:m00_b_ov13850 4-0010
root@linaro-alip:/# grep "" /sys/class/video4linux/v*/name | grep mainpath
/sys/class/video4linux/video8/name:rkisp_mainpath
❹ preview/ record video/ take photos
1gst-launch-1.0 v4l2src device=/dev/video8 ! video/x-raw,format=NV16,width=1280,height=800, framerate=30/1 ! kmssink     //preview
2gst-launch-1.0 v4l2src device=/dev/video8 num-buffers=100 ! video/x-raw,format=NV12,width=1920,height=1088,framerate=30/1 ! videoconvert ! mpph264enc ! h264parse ! mp4mux ! filesink location=/tmp/h264.mp4    //record video
3gst-launch-1.0 -v v4l2src device=/dev/video8 num-buffers=10 ! video/x-raw,format=NV12,width=1280,height=800 ! mppjpegenc ! multifilesink location=/tmp/test%05d.jpg    //take a picture
The files are saved in /tmp
1root@linaro-alip:/# ls tmp